
Pages
Pages are used for the Home, About, Events, etc. You can add, update and delete pages – which you can read more about below.
Add a Page
- In the back-end of WordPress, hover over Pages in the left-hand column and click on Add New.
- Alternatively, you can click on Pages in the left-hand column, and then click the Add New button at the top of the page.
- Enter a Title and complete the Hero section. Select as many Content Modules (more info below) as necessary and click Publish in the top right.
Edit an Existing Page
- In the back-end of WordPress, click on Pages in the left-hand column, and then click the title of the Page you’d like to update.
- Update the Title and any additional Content.
- Click Update in the top right.
Delete an Existing Page
- In the back-end of WordPress click on Pages in the left-hand column, and then hover over the title of the Page you’d like to delete.
- Click on the Trash link that appears below the title.
- To undo a delete, click on the Trash link above the list of Pages, find the page you’d like to restore and click the Restore link.
- Alternatively, you can delete a page by viewing the edit page for the specific page, and click Move to Trash in the top right, next to the Update button.
Programs
Programs are pages specifically for camps and trips.
Add a Program
- In the back-end of WordPress, hover over Posts in the left-hand column and click on Add New.
- Alternatively, you can click on Posts in the left-hand column, and then click the Add New button at the top of the page.
- Fields to complete:
- Program Dates — enter dates for the program. A Start Date and Start Time are required.
- Click ‘Show in Upcoming Events’ if this will be displayed on the homepage ‘Upcoming Events’ section. This ensures the correct date is displayed.
- Date Range — select this if the program is more than one day. An End Date field will then appear.
- Alternate Time — enter an alternate time, which will be displayed in the filter section.
- Hero
- Hero Image — Upload a Hero Image
- Hero Heading — Add a heading
- Hero Subhead — Enter an optional subhead
- Content Modules — more info on each of the content modules is listed further down on the page. The content modules that we recommend for this page include:
- 2 Column Photo — Overview, Activities, Itinerary
- Image Gallery
- Testimonial
- 2 Column Photo — rates and dates table
- CTA Block — used for registration
- Excerpt — enter an excerpt, which will be used to explain each program when you hover over it on the homepage and Explore pages. This excerpt is limited to 50 words.
- Sidebar Content – primarily used for filtering
- Grade — select all applicable grades for the camp/trip
- Type — select whether this is categorized as a camp or a trip
- Session — select which Session this goes under. Add a new session if it is not listed.
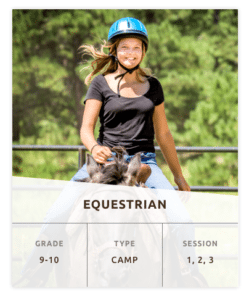
- Program Filter Custom Results — this gives you more flexibility for what is displayed in the filter results. For example, if a camp is listed in Session 1 and Session 2, we recommend condensing this to 1, 2. See image to the right.
- Featured Image — upload an image that will be displayed on the filter results section.
- Click Publish in the top right.
- NOTE: if you click Programs > Grade, you can add an additional grade. However, each grade is also assigned a Term Order. The term order should match the grade as it ensure the grades are displayed in chronological order.
- Program Dates — enter dates for the program. A Start Date and Start Time are required.
Edit an Existing Post
- In the back-end of WordPress, click on Posts in the left hand column, and then click the title of the Post you’d like to update.
- Update the Title and any additional Content and click Update in the top right.
Delete an Existing Post
- In the back-end of WordPress, click on Posts in the left-hand column, and then hover over the title of the Post you’d like to delete.
- Click on the Trash link that appears below the title.
- To undo a delete, click on the Trash link above the list of Posts, find the post you’d like to restore and click the Restore link.
- Alternatively, you can delete a post by viewing the edit page for the specific post, and click Move to Trash in the top right, next to the Update button.
Posts
Posts are the blog posts or news items you’ll publish on the Ranch Camp site.
Add a Post
- In the back-end of WordPress, hover over Posts in the left-hand column and click on Add New.
- Alternatively, you can click on Posts in the left-hand column, and then click the Add New button at the top of the page.
- Enter a Title and content.
- Hero – upload a hero image.
- Content Modules – you have the option add additional content modules to each blog post, but we recommend using these sparingly. For example, an image gallery may be a good additional to a blog post if you are writing about a particular camp session.
- Excerpt – you can provide an optional excerpt, which will be displayed when you hover over the blog post images on the main blog landing page. If an excerpt is not provided, the first 35 words from the main WYSIWYG editor will be displayed.
- Click Publish in the top right.
Edit an Existing Post
- In the back-end of WordPress, click on Posts in the left hand column, and then click the title of the Post you’d like to update.
- Update the Title and any additional Content and click Update in the top right.
Delete an Existing Post
- In the back-end of WordPress, click on Posts in the left-hand column, and then hover over the title of the Post you’d like to delete.
- Click on the Trash link that appears below the title.
- To undo a delete, click on the Trash link above the list of Posts, find the post you’d like to restore and click the Restore link.
- Alternatively, you can delete a post by viewing the edit page for the specific post, and click Move to Trash in the top right, next to the Update button.
Events
Events do NOT have individual pages associated with them. Instead, their content is displayed on the homepage under the Upcoming Events section or on the calendar.
Add an Event
- In the back-end of WordPress, hover over Events in the left-hand column and click on Add New.
- Alternatively, you can click on Events in the left-hand column, and then click the Add New button at the top of the page.
- Enter a Title, tagline, location name, location address, etc.
- Under Program Dates, enter the Start Date and Start Time of the event. All other fields are optional.
- Date Range — for camps, you can check the Date Range box and an End Date field will appear.
- Start Time is required. Even if it is a camp, you must enter a start time. To ensure these appear correctly on the calendar, I would recommend making the start time coincide with the Session order. For example: Session 1 has a start time of 12:00 a.m., Session 2 has a start time of 12:01 a.m., Session 3 has a start time of 12:02 a.m.
- Alternate Time — if you would not like the time to appear (especially for camps), you can provide alternate text that will appear on the calendar, such as ‘All Day.’
- Show in Upcoming Events — this is related to the ‘Upcoming Events’ section on the homepage. When an event has multiple dates, you must select this for the date you would like displayed. If there is only one date, it will automatically choose that date. NOTE: you still need to select the actual events from the homepage relationship picker, but this specifies which date should be displayed.
- Under Program Dates, enter the Start Date and Start Time of the event. All other fields are optional.
- Click Publish in the top right.
Edit an Existing Event
- In the back-end of WordPress, click on Events in the left-hand column, and then click the title of the Event you’d like to update.
- Update the Title and any additional Content and click Update in the top right.
Delete an Existing Event
- In the back-end of WordPress, click on Events in the left-hand column, and then hover over the title of the Event you’d like to delete.
- Click on the Trash link that appears below the title.
- To undo a delete, click on the Trash link above the list of Events, find the event you’d like to restore and click the Restore link.
- Alternatively, you can delete an event by viewing the edit page for the specific event, and click Move to Trash in the top right, next to the Update button.
Bios
Bios created in this section are used within the Bios Content Module. See the Content Modules section for additional details on how to display a bio.
Add a Bio
- In the back-end of WordPress, hover over Bios in the left-hand column and click on Add New.
- Alternatively, you can click on Bios in the left-hand column, and then click the Add New button at the top of the page.
- Enter a Title, Description (in the WYSIWYG editor), Featured Image, Phone Number, Email and Job Title.
- Click Publish in the top right.
Edit an Existing Bio
- In the back-end of WordPress, click on Bios in the left-hand column, and then click the title of the Bio you’d like to update.
- Update the Title and any additional Content and click Update in the top right.
Delete an Existing Bio
- In the back-end of WordPress, click on Bios in the left-hand column, and then hover over the title of the Bio you’d like to delete.
- Click on the Trash link that appears below the title.
- To undo a delete, click on the Trash link above the list of Bios, find the event you’d like to restore and click the Restore link.
- Alternatively, you can delete an event by viewing the edit page for the specific event, and click Move to Trash in the top right, next to the Update button.
Options
There are certain site-wide options available in the Options tab. In the back-end of WordPress, click on the Options tab in the left-hand sidebar.
- Header — if you would like to change the logo in the header, you can upload a new image here.
- Footer — add content for the footer section, including contact info, social media links and logos
- Alert Bar – You can enable an alert that will be displayed across the entire site using this functionality. Enter a Start Date, End Date, Heading, Content and Link. Click the Add Alert button to schedule additional alerts. NOTE: There should only be one alert during a single timeframe.
- 404 Page – Add a title and custom text for the 404 page
- Filters — For the filters on the homepage and Explore page, you have the option to add some descriptive text below each filter type (grade, type, session).
- Google Analytics – Paste your Google Analytics tracking ID to ensure analytics are enabled.
Content Blocks
Content Blocks provide flexible content sections within each of your pages and posts. Content Blocks are explained below, but I would recommend visiting this sample page to get a better understanding of each content module. To add a Content Block, click the “Add Content Block” button and select from the following:
- Callout — the callout section allows you to highlight certain content. This is a full-width block with an optional background image that will span the width of the browser window.
- Callout Text — you are limited to 120 characters for the copy.
- Alignment — by default, the callout content is aligned to the left side of the page. You can choose to change the alignment to the right by clicking the Callout Copy Alignment checkbox.
- Callout Links — add up to 2 callout buttons. Click the Add Callout Link button to add a button.
- Tabs — add tabbed content by clicking the Add Tab Block button.
- Title — add a title for each tab
- Content — add additional copy for each tab
- Accordion — accordion (dropdown) content can be added by clicking the Add Accordion Block button.
- Title — add a title for each accordion
- Content — add copy for each accordion
- Video — videos must be housed on a separate site such as Youtube or Vimeo. Copy the video link and paste it directly into the WYSIWYG editor.
- Bios — select all of the bios in the left-hand relationship field that you’d like displayed on the page. Everything in the right-hand column will appear on the page.
- Large Image Block — add a full-width image that will span the width of the page.
- Testimonial — testimonials are full-width blocks.
- Testimonial Image – add an optional background image. If not image is selected, a background of icons will be displayed.
- Testimonial Quote – add the quote
- Attribution Name – add the name of the person to whom the quote is attributed
- Attribution Title – add the title of the person to whom the quote is attributed
- Attribution Photo – add the photo of the person to whom the quote is attributed. If nothing is provided, a default avatar will be displayed.
- Button – add a button ( internal or external)
- Header Block — add a headline to separate sections of your page.
- Hide Header — for sections, such as the Testimonial block, that will appear on the Program page but do NOT require a header, please click this checkbox. It will ensure that a Testimonial link is still included in the sticky navigation.
- Image Gallery – within the WYSIWYG editor, click the Add Media button. When the media window appears, in the left-hand sidebar, click Create Gallery. Select all of the images you’d like in the gallery. Click the Create a new gallery button in the bottom right. The first image will serve as the “featured image” and will be twice as large as the other images. If captions are included, these will be shown when the image opens in a modal window. NOTE: you can select as many images as you’d like for the gallery, but only the first 5 will be displayed. All images can be viewed when cycling through the image lightbox.
- Text Block — the text block is a regular WYSIWYG editor.
- Text Area – this is a standard WYSIWYG editor
- Sidebar Block – to add a sidebar, click the Add Sidebar button
- 2 Column Photo — this module is used primarily for the Programs page where there is text beside a photo.
- Content Block Header — enter a Header for the text block.
- Content Block — provide additional content in the WYSIWYG editor
- Photo Block — add an image to fit half of the screen. An approximate size for cropping the image is 1300 x 800. You should crop the image beforehand since we cannot guarantee the focal point of the image will be in view. Also, the crop dimensions are an approximation since the image will always take up the full height of the viewer’s screen, which may vary.
- CTA Block
- Program Register Link — click if this is a registration link
- CTA Text — enter text for the CTA (e.g., Register Now)
- CTA Link Type — select whether the link will be an external url, internal page, phone number, or email
- Form Block
- Contact Form — select this if it is the Contact Form (it has different styles than the other forms)
- Form CTA — add a short amount of CTA text
- Form — paste the WuFoo shortcode into the text editor
Text Formatting
In the WYSIWYG text editor, there are additional formatting options. These include:
- Intro Text — Intro text is slightly larger than the body copy and is used to introduce the content or highlight the beginning of a block of text. Above the WYSIWYG editor, click Format > Formats > Intro Block.
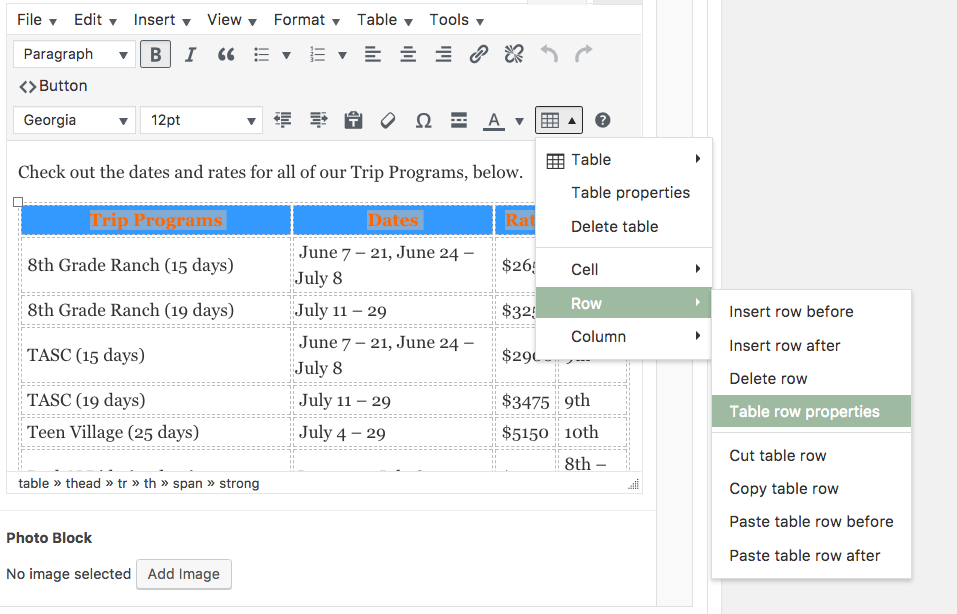
- Tables – In the WYSIWYG editor, click the table button and select Insert table. Move your mouse across the grid to select the number of rows and columns you’d like to insert. Once the table is inserted, you will have to expand the table in the text editor
NOTE: Tables have special formatting for the headers to ensure they work on mobile. Follow the instructions below:
• Highlight the Header row and click the Table Icon. Select Row > Table row properties.
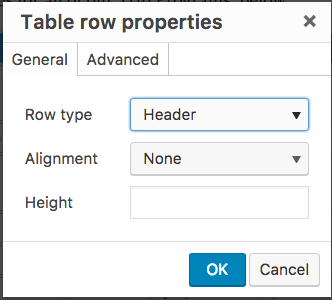
• Select ‘Header’ from the Row type.
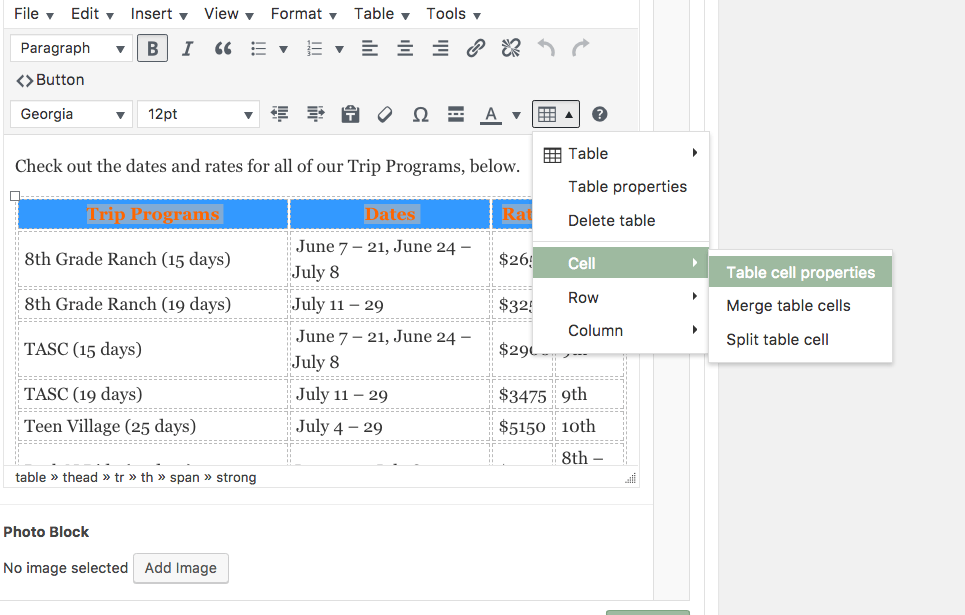
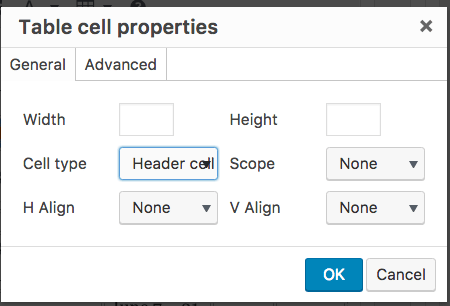
• Highlight the Header row again and click the Table Icon. Select Cell > Table cell properties.
• Select ‘Header cell’ from the Cell type.

Header 1 Header 2 Header 3 Header 4 Header 5 Header 6 Test 1 Test 2 Test 3 Test 4 Test 5 Test 6 - Buttons – highlight the text you’d like to turn into a button and Select the button color from the dropdown menu. When prompted, enter the url for the button. You can select either an internal, external or download link.Click Here
Image Sizes
There are specific images that will be cropped to a certain dimension to fit the design. If the uploaded image does not at least meet the cropped dimensions below, it may look pixelated. NOTE: The crop will only occur if the image size is LARGER than the dimensions listed below.
- Hero (Homepage) — 1440 x 810px
- Callout (background image) — 1440 x 620px
- Filters and Blog Posts Cards – 407 x 500px
- Bio — 260 x 260px
- Testimonial (attribution photo) – 80 x 80px
- Image Gallery (Large Image) — 720 x 720px
- Image Gallery (Regular Images) — 360 x 360px
- Large Image – 1440 x 720px